
Today is very cold, damp and dreary.
The heat is back on and I'm struggling to stay warm!
♦♦♦
Today, I'm going to share how I assemble
a pinkeep drum....

For today's tutorial I'll be using the model from
the Little Sparrow Pinkeep Club ~ "A Token of Spring".....it's not to late to join and
still receive this kit :)
still receive this kit :)

For those who have finished the stitching, now is the time
to decide if you want to coffee stain your piece or not?
If you decide to coffee stain ~ please view my separate
tutorial for this process by going to my post dated Monday,
January 12, 2015 ~ titled"Queen Esther's Pure Heart".
♦♦♦
This first set of pictures show how to achieve a
perfect cutting line....

Whenever I need to cut linen I always pull a thread first,
it's simple to do and keeps everything neat and tidy.
For your finished piece you will need to pull a thread across
the top and again across the bottom, as shown on the
pattern sheet.

Ta dah....this is how things should look after trimming
away the excess linen!

Next, you're ready to cut out the top and bottom circles
from the provided homespun fabric included in the kit.
Then, on the backside...

Using a pencil, place a small mark on the top edge marking
checkpoints at 1/4, 1/2 and 3/4 intervals.
Simply fold the fabric in half and then in half the other
way; repeat on both circles.

Or, you can center your circles on a grid mat.
Also, in pencil mark one "top" and the other "bottom".
Next....you're ready to begin assembly!
♦♦♦
Stitching the back seam....

Fold design in half with right sides together; VERY carefully
match up the diamond motif stitches with pins to ensure an accurate
finished back seam....machine OR hand stitch a 1/4" seam.
The hand stitching method is done in tiny back stitches, which
creates a very strong seam and I feel is more accurate because it
gives me more control over where each stitch is placed....definitely
my favorite method!
Next, trimming that seam....

If you own a pair of pinking shears...this is a great time to use them!
Not only will they keep your seam neat, pinking shears help to
prevent a seam from fraying.
Press the seam open using either your fingers, a wood pressing
tool as shown in the photo, or ironing.
♦♦♦
For accurate assembly, checkpoints are a must....

Place a small pencil mark on the top edge marking
checkpoints at 1/4, 1/2, and 3/4 intervals...these will match
up with the marks on the fabric circles.

Fold in half and then in half the other way;
repeat on the bottom edge.
~ Pinkeep Drum Will Be Completely Assembled
From The Inside Out ~

Place one circle on top of the linen with right side of homespun fabric
facing down. Start by matching the pencil checkpoint marks on
circle top to the checkpoints of design piece using pins.

...then continue adding more pins between checkpoints.

Repeat this process on the bottom.

After top and bottom is all pinned...sew up the seams!

I like to mark in pencil a 1/4" stitching line around the diameter.
Then choose your favorite stitching method...either
machine or hand stitch.
Stitch 1/4" seam sewing together the top of the drum to the design
piece. Repeat these steps for the drum bottom.
Trim finished seam with pinking shears.
To turn the drum right side out; cut a small slit into the
bottom circle (double checking to make sure you're
cutting the bottom circle and not the top).

Turn the drum right side out.
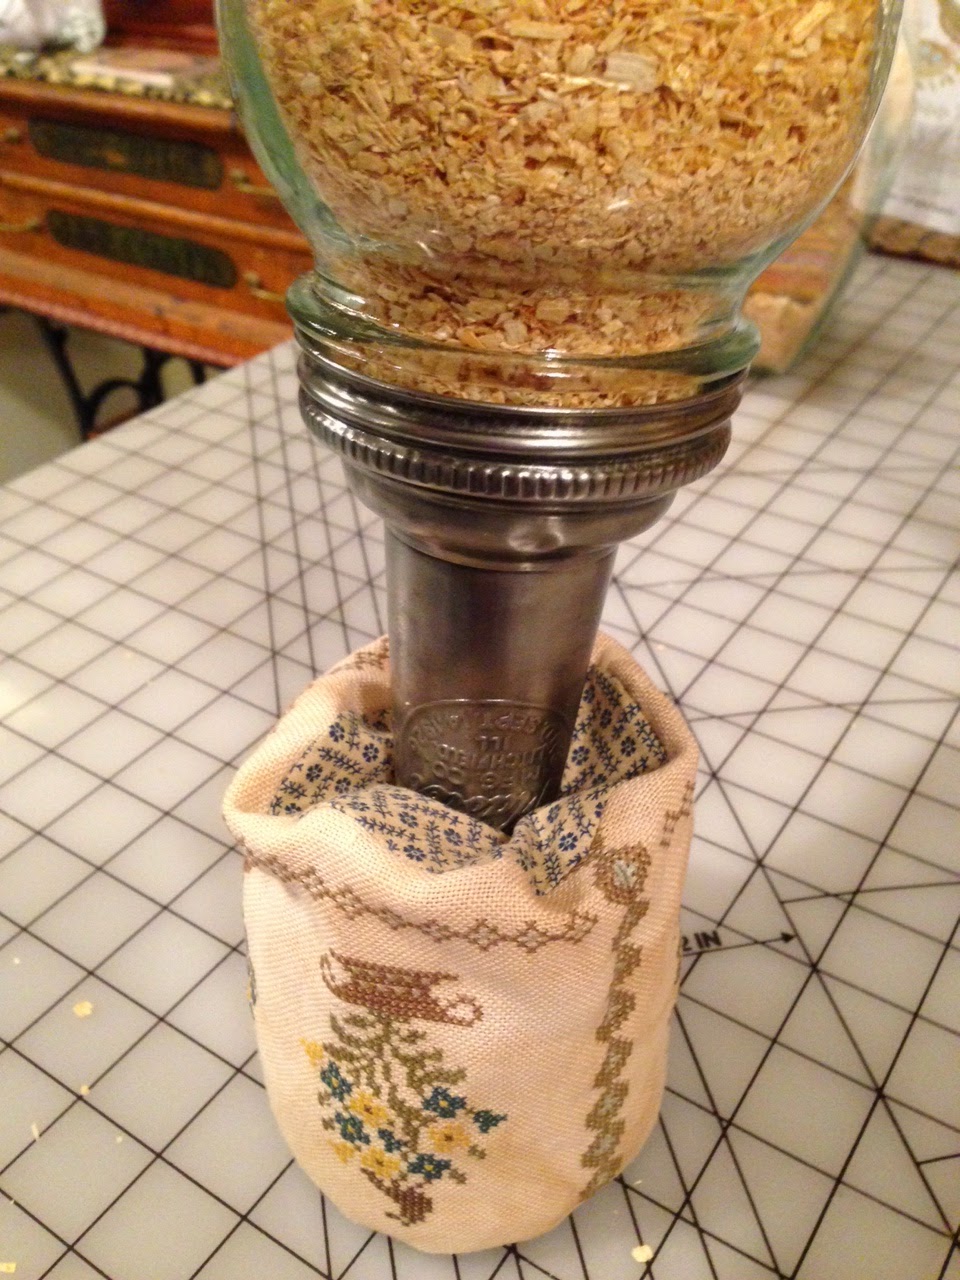
For the model I used sawdust. If choosing this filler pack
very firmly thru the opening. Constantly filling and packing
as tight as possible, using 1 full quart jar of sawdust, an
old glass quart oil jar with a funnel (as shown in photo)
works fabulous!
1 quart bags of farmfresh sawdust are available in my Etsy
Shop.
Finally, stitch opening shut, then hand stitch a little patch
over the opening. Using one strand of DMC 611, embellish the
top and bottom seams with small X's (optional).
All finished...enjoy making pinkeep drums!
♦♦♦
Mama Robin is very busy sitting on her
nest above my Studio door...

I'm looking forward to the sound of baby birds chirping
once again!
♦♦♦
I've been busy working on the design for the first kit
coming soon for Humble Hare Handwork Club.
.jpg)
♦♦♦
~ Weekly Soul Food ~
My brethren, count it all you when ye fall into
divers temptations; knowing this, that the
trying of your faith worketh patience.
But let patience have her perfect work, that ye
may be perfect and entire, wanting nothing.
~ James 1:2-4...KJV ~
♦♦♦
Sorry for the long post today...hope the tutorial was helpful?
To all my friend scattered everywhere in this
big world...have a great week!
Kindly, Tammy
Thank you! Wonderful instructions.
ReplyDeletePug hugs :)
Lauren
Wow! You did not know, but I have put off a drum finish for one year BECAUSE of lack of directions. This is awesome. Thank you so very much!
ReplyDeleteI am freezing. We got spoiled for one week, didn't we? ;)
I must try one of these finishes. First to find a design to do so! Great tutorial.
ReplyDeleteI am go excited to say that I just sent off my first installment to Humble Hare Handwork Club. I am waiting on pins and needles to see what the first kit will be...
ReplyDeleteThank you so much. Wonderful directions and photos.
ReplyDeleteThis is beautiful!
ReplyDeleteThanks for the tutorial. Sawdust sure looks better than using polyfil stuffing!
ReplyDeleteThanks ever so much, Tammy. I, like Vickie, needed that extra push to finally finish my pinkeep drum. BTW, I absolutely love your Bible verses on each post. I look so forward to them and most times that post's thought is exactly what I need that day.
ReplyDeleteOkay, I'm now hopping over to join your Humble Hare Handwork Club. I'm so excited!
Love from Diane in North Carolina
This is fabulous! I plan to use this tutorial this weekend to finish my club drum piece. I have in hand your sawdust! You don't recommend that we use fusible interface on the linen first? Wouldn't that make a better seal for the sawdust? Thanks for a great tutorial! -Holly in VA
ReplyDeleteYeahhhh ... read and inwardly digested and hopefully repeating with one I need to finish off asap ... thank you once again :) love mouse xxxxx
ReplyDeleteGreat tutorial! Thanks for sharing.
ReplyDeleteไม่อยากเสี่ยง เจอเว็บโกง หรือหาเว็บประจำอยู่
ReplyDeleteเรามีเว็บดีเว็บดังมาแนะนำต้องเว็บนี้เลย
สล็อต666