
Hello special friends and neighbors...how are you doing today?
Are you bright and happy and ready to
face the challenges of a new week?
♦
Please let me introduce you to "Miss Matilda"...

"Miss Matilda" Pillow Tuck
and Pumpkin Pinkeep Necklace
Matilda's keeping her eye on that crow...while the pumpkin's
keeping an eye on her!
Matilda was stitched on 32ct Weeks Dye Works ~ Confederate Grey,
using threads from Weeks Dye Works (4), Gentle Art (1), DMC (1).
The finished size of the pillow is 6"W by 6.5" H.
Pumpkin Pinkeep Necklace...

The Pumpkin Pinkeep Necklace was stitched on
30ct Weeks Dye Works ~ Tiger's Eye Linen, using
glass seed beads for the facial features.
This pattern is for both the pillow tuck and the
pinkeep necklace.
Do you like Miss Matilda?
She would love to be stitched and adopted into
your home for Halloween!
She is now available in my Etsy Shop, here is the direct
link to take you there...
♦
Today's post will be a tutorial for
The Sheepish Needle Samplar Club's
first kit...

"Moriah's summer Token" Hand Fan
~ Begin by stitching design using 1 strand
of DMC over 2 linen threads.
~ Make template using see~thru plastic like
"Quilter's Template Plastic" (Hobby Lobby),
mark center point by running a needle down
thru the center of the template plastic.
Please click onto each picture collage for easy viewing...
then read the corresponding instructions to
the number on each photo.
Photo Numbers 1~5

No. 1 ~ My favorite medium weight cardboard is "Dry Mixed Media" available at Hobby Lobby in 15" by 20" sheets...I would not recommend foam core, it is to
thick and difficult to cut into a circle with a smooth edge.
thick and difficult to cut into a circle with a smooth edge.
No. 2 ~ Trace around template, cut out and mark center point with
needle...set aside.
No. 3 ~ Trace template onto ruff side of batting, cut 1 on trace line.
No. 4 ~ Use Elmer's Craft Bond glue stick on one side of fan board,
lay ruff side of batting on top, press down while
smoothing out.
No. 5 ~ Use a needle to find the center point of batted fan board and mark with a pencil.
Photos 6~8

No. 6 ~ Find center point of stitched linen with a needle, match to
batted fan board.
No. 7 ~ Hold up to window to find the perfect alignment.
No. 8 ~ Flip over, using pencil, trace around fan board on the backside
of linen (be careful not to move linen out of alignment),
set fan board aside for now.
Photos 9~11

No. 9 ~ Use needle & contrasting thread, do a running stitch on
penciled line.
No. 10 ~ Use pinking shears preferably, regular scissors will work.
No. 11 ~ Round off corners only, leaving as much linen allowance
as possible...will trim again later.
Photos 12~15

No. 12 ~ Sequin pins work best for this next step...this photo compares
a regular pin and a sequin pin...available at Michaels.
No. 13 ~ Place linen on top of batted fan board, match center points with
a needle.
No. 14 ~ Use running stitch as a guide, gently stretch linen over fan
board so running stitches are over edge of fan board,
use sequin pins to hold in place as you go around.
No. 15 ~ After pinning flip over to backside now trim off excess linen
to about 1".
Photos 16~18

No. 16 ~ Carefully cut small notches all the way around.
No. 17 ~ Use small amounts of "Aleene's Fast Grab Tacky Glue" as
you work around the fan board.
No. 18 ~ Press down glued linen until smooth.
Photos 19~21

No. 19 ~ Pull out sequin pins.
No. 20 ~ Use a needle tip to slowly pull out the running stitches...a few
at a time.
No. 21 ~ Thread completely pulled out.
Photos 22~25
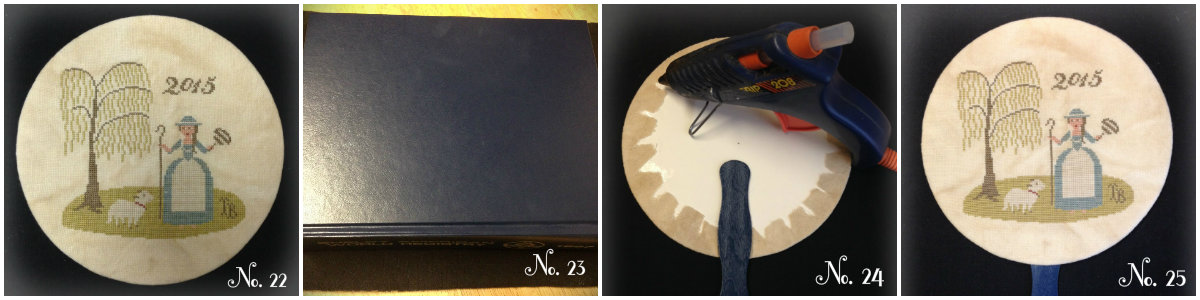
No. 22 ~ Front side is now complete!
No. 23 ~ Lay a very heavy book on top of the fan board allowing to
thoroughly dry for several hours (this is very
important so fan board will lay nice and flat.
No. 24 ~ Attach fan stick to backside of fan board using a hot glue gun.
No. 25 ~ Overall look before finishing the fabric backing.
Photos 26~29

No. 26 ~ Trace template on back of Civil War fabric...trace line is stitching line, cut 1/2" beyond this line.
No. 27 ~ Use needle and contrasting thread, do a running stitch on penciled line.
No. 28 ~ Cut small notches all the way around.
No. 29 ~ Fold edge over using running stitch as a guide, pressing as
you fold.
Photos 30~32

No. 30 ~ Pull thread to remove running stitch.
No. 31 ~ Thread completely removed
No. 32 ~ Civil War fabric all prepped!
Photos 33~36

No. 33 ~ Trace template on ruff side of 2nd piece of batting...cut on trace line. Spray ruff side with Elmer's Craft Bond
Multi~Purpose Spray Adhesive.
No. 34 ~ Press onto backside of fan keeping batting slightly in from outer edge of fan.
No. 35 ~ Position fabric design in correct direction on backside of fan.
No. 36 ~ Use matching thread to whip stitch around to complete fan.
Photos 37~38

No. 37 ~ Small gap over the wood where you can't stitch.
No. 38 ~ Better angle of this gap!
Photos 39~42

No. 39 ~ Aleene's Fast Grab Tacky Glue works great for this gap!
No. 40 ~ A thin tipped coffer stir stick works great!
No. 41 ~ Carefully insert glue
No. 42 ~ Press down for a nice clean sealed up gap!

All finished...enjoy your Moriah's Hand Fan!
Moriah could also be finished as a framed samplar...the choice
is your!
Thank you for viewing, hope this tutorial was helpful!
♦
~ Weekly Soul Food ~
The wind bloweth where it listeth,
and thou hearest the sound thereof,
but canst not tell whence it cometh,
and whither it goeth.
~ John 3:8...KJV ~
♦
Hope everyone enjoys a great week!
Please stop back on Friday to see what's new.

Beautiful as always my friend! You have such a gift and your willingness to share your talents and knowledge with us is so wonderful. The time it took to put together the instructions and photos for the pieces above is, I am sure, much appreciated. Continued blessings to you my friend!!!! Always enjoy your blog and your work nourishes the heart, mind and soul.
ReplyDeleteHi David, What a thoughtful and kind comment...you TRULY made my day! Yes, you are right this tutorial took me seven hours to complete! Thank you for being my friend :)
ReplyDeleteYour tutorial is incredible. Thank you for sharing. For someone like me it is the difference between wishing I had beautiful and unique items and having the courage to make it happen.
ReplyDeleteThis comment has been removed by the author.
ReplyDeleteTammy: I love Matilda, what a sweet looking cat.
ReplyDeleteThe pumpkin is adorable, what a great idea to use beads for the facial expression.
Moriah is beautiful, I will start stitching on her this weekend, thank-you for thr tutorial, it surely helps with the finishing.
Blessings
Catherine
ไม่อยากเสี่ยง เจอเว็บโกง หรือหาเว็บประจำอยู่
ReplyDeleteเรามีเว็บดีเว็บดังมาแนะนำต้องเว็บนี้เลย
สล็อต666